Firebase is an attractive service from Google to build web, Android, and iOS applications. Visual Studio Team Services is an amazing service from Microsoft to host code and to run deployment script. How can we combine these two services together?
Apparently, it is not difficult and it can lead to a very deadly combination. So far I am familiar with Firebase Hosting feature to deploy this blog site (see my previous blog post on Static Site with Hugo and Firebase). In that setup, I am using GitLab. While GitLab works well for this purpose and I am always curious to explore different alternatives. Team Services, an offering from Microsoft under the Visual Studio umbrella, is a perfect contender.
If you are new to VS Team Services, think of it as a project collaboration tool equivalent to GitHub, Bitbucket, GitLab, etc. In a way, it is very comparable to GitLab. For a hobbyist, you can have unlimited private repositories, along with some generous allowance for your automatic build and continuous integration process.
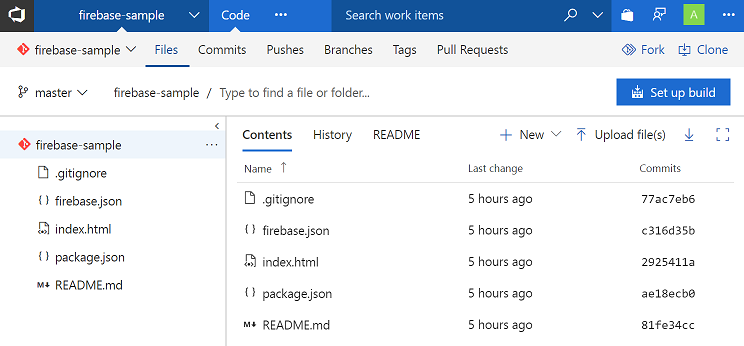
Assuming that we have a Firebase web app (perhaps a blog like this created using a static site generator), how would we deploy it automatically everytime we commit a new change? First step, go to VS Team Services and create a new repository. After that, push the code to this new git remote. Now from the Code tab, we can see the contents of the project in full glory.
Click the big blue button Set up build on the top right. This spawns a new tab where we need to define a new build process (since the predefined build setups does not cover Firebase yet).
Select Empty as the template, give it a descriptive name, and choose Hosted for the Agent choice. Since we run the build on a hosted agent (which BTW running Microsoft Windows), we need to specify the required capability so that the right agent can be chosen for the job. Because Firebase CLI relies on Node.js and npm, we simply request that the agent has that npm executable. This is done by including this requirement in the Demands subsection of the Agent selection section.
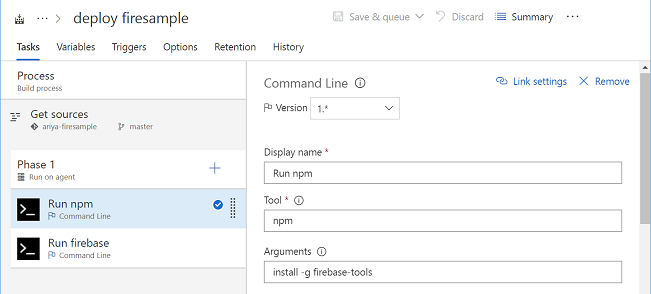
After this, add two build tasks. Create each task based on the Command Line or Powershell template. For the first task, we are going to simply execute npm install -g firebase-tools. The second task is doing the actually deployment, it should be something like firebase deploy --project firebase-sample --token 1/abcdef456, with the token representing the CI token we can obtain using the Firebase CLI.
Since we want this build process to be invoked everytime there is a new commit, switch to the Trigger tab and enable such a trigger. There is even a fancy opportunity to specify branch configuration that can trigger the build (in most cases, simply choosing master is sufficient).
We are now set! Everytime a new commit appears in the repository, the whole deployment process will kick in and a new application should be available in a minute. Happy deploying!